Jetbeetle's Wind Energy Sector
Visit us at http://jetbeetle.com.tw
| Back | Next |
JetWatts 1.5KW Wind Turbine |
|
Picture |
Description |
 |
We've got to do something to help slowing down
the global warming. 3 months ago I decided to start this project, before
that many months of Google research and books study, I finally
finished my own design of a small wind turbine in May 2007 and soon after
that I started making parts.
Picture shown : hub + blades, you can compare the size of this wind turbine to a small car. |
 |
Closer up view of hub. Each blade we
use 5 bolts to lock them tight. Technical Specifications of JetWatts 1.5 Rated Power : 1500W at 10m/s Rotor Diameter : 3.0 m Start up wind speed : 3.0m/s Blades : GFRP (fiberglass reinforced composite) Type : Down rotor Rated speed : 400rpm Number of blades : 3 |
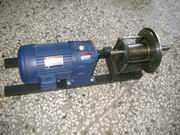 |
This is what the inside of the nacelle looks like.
On the right is our shaft tunnel with two bearings. On the left is our
generator with gearbox. Between them there will be inserted a disk
brake actuated by hydraulics. Generator, shaft tunnel all seat on a common base frame made of steel beams. Now we are very close to the finish line. |
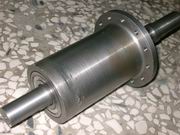 |
The shaft tunnel for low speed shaft. I
make this shaft tunnel for two purposes :
1. In most small wind turbines, they treat the bearings inside the alternator as supports for low-speed shaft, this is not good for alternator's life. Be sure to transmit torque only, we need this shaft tunnel as a filter to remove all bending moments before the captured wind energy enters the alternator. 2. I need longer low-speed shaft as I am using down rotor. |
 |
Test spinning the rotor of our wind turbine. Quite smooth the bearings turning. Click on the picture to see the video clip. |
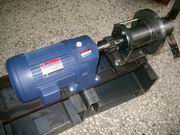 |
I removed the front plate from the
assembly and
trimmed the sides of the plate to fit the edge line of base frame, so that we can put the
cover on nicely afterwards. After the shaft alignment is done, we put the shaft coupling on the shaft and use keys and bolts to lock them tight. There is yet a disk brake waiting to be installed. |
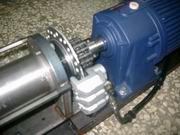 |
The disk brake is on. I added a
flange on the shaft for mounting the disk Now the mechanical is almost done,
after the cover of the nacelle is mounted it will looks very pretty. We have done a optimized version on the drawing board, lighter weight without sacrificing anything. It has been raining for more than two weeks here, we'll find a good day to install the wind turbine ! |
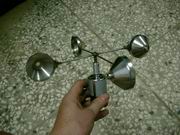 |
I think it would be fun so I made this anemometer for measuring the wind speed. How do we relate the outputs to wind speed ? Well, you could measure the RPM's and normally they are proportional to wind speeds, ie, the transfer function is quite simple in frequency domain. You could also measure the voltage outputs but you'll need to do some non-linear manipulations on the voltage to get the correct wind speeds. The cups are made of small stainless funnel which are usually used in the kitchen. Click on the picture to see the video clip of test spin. |